How To Upgrade Your Macbook Air with an SSD (2023 updated)
The definitive guide
It's not really, we know you don't believe us, so we created this guide! It has everything you need to know, to upgrade to a bigger SSD. Read it now, save it for later or just work out how much it will an upgrade will cost compared to a new Mac.
Keep scrolling, everything you need is contained here, provided free, no catches. If you think that is worth a like or a share, that would be awesome...buying one of our SSDs would be even better :-)

Introduction
If your Macbook Air has slowed down or you have run out of storage, we have the solution. You need a bigger, faster SSD.
Why would a Macbook Air slow down?
It is the speed and size of data getting processed! Files, such as videos, are getting bigger to processor, the SSD in your Macbook Air is finding it hard to keep up. The good news is the latest SSD upgrades can make your Mac like new. The speed of the Aura Pro 6G is twice as fast as your original SSD. If your Macbook Air (2013-2017) can use the new Aura Pro X2 then the new SSD reads data at 3.2GB per second, making it feel like new! You can get x16 more data than your original drive, it is blisteringly fast, which means there is no better time than now to upgrade and not buy a new Macbook Air.
Can you do the upgrade yourself?
This is why we created the mighty guide you are reading. Everything you need to know, but it does not stop there. It is an example of our customer service. When you buy from Upgradeable, local tech support is just a phone call away. We have helped thousands of people with Apple computers upgrade their Macs. All that experience is distilled in this guide and much more on our website. We have tried to show exactly what you need to do in simple steps. We call this our "Four R method", because each step starts with the letter R. REPLACE, RESTART, READY and RESTORE. Choose the method that suits you best, and we'll show you how to do it, tell you the hardware you need and back you up with awesome customer technical support.
Don't want to do it yourself? That is fine, we have installation services or we can refer you to a local technician.
Chapters
Four R method: Time Machine

The easiest way to upgrade to a new SSD is to use Time Machine. All you need are tools and the SSD! You can either restore a whole back up, which includes macOS or you can migrate using the Time Machine after installing a new macOS.
Our Four R method is a proven easy way to upgrade to a bigger and faster SSD.
REPLACE
Remove the old drive, and install the new SSD. We provide detailed printed instructions when you order an SSD, if you type your Macbook Air model into the customer notes at checkout.
RESTART
Plug Time Machine into the USB port. Restart your Mac holding down the Option key. This loads Boot Manager and will show Time Machine, double click to boot from Time Machine. If the Time Machine does not show then restart hold own Option + Command + R keys (this is Internet Recovery Mode). Both of these methods will show on screen the MacOS Utilities page.
READY
The drive is shipped to you formatted, and ready to use. To check open Disk Utility. If it is unformatted, choose format type (must use APFS for Ventura, Monterey, Big Sur, Catalina, Mojave or High Sierra, earlier versions use Mac Extended Journaled) and a name, you can use Macintosh SSD or get creative and give it a person's name like Oscar. Click apply and this will format the SSD.
RESTORE
Go to Restore from Time Machine Backup (one of the options on MacOS Utilities page). Choose the latest back up, and follow the steps. Time Machine will now start restoring onto the new SSD. If it can not restore the OS it will ask you to install MacOS first and then use Time Machine to restore data.
Software and tools you need
The great thing about a Time Machine restore is you only need the SSD and tools to open the Macbook Air.
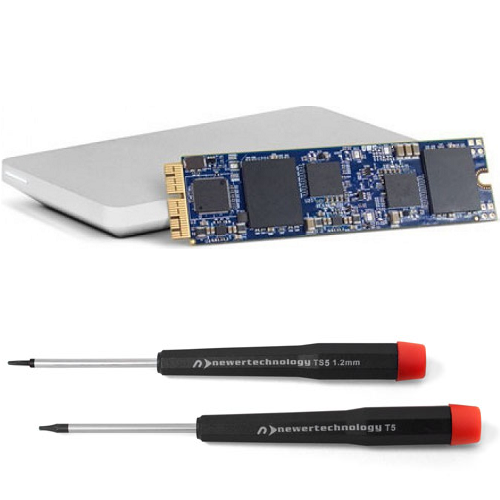
• The tools you require are included in our SSD upgrade kits.
• Choose an SSD drive here
• Don't have a Time Machine backup? Read the Apple guide on Time Machine backups
Four R method: Cloning
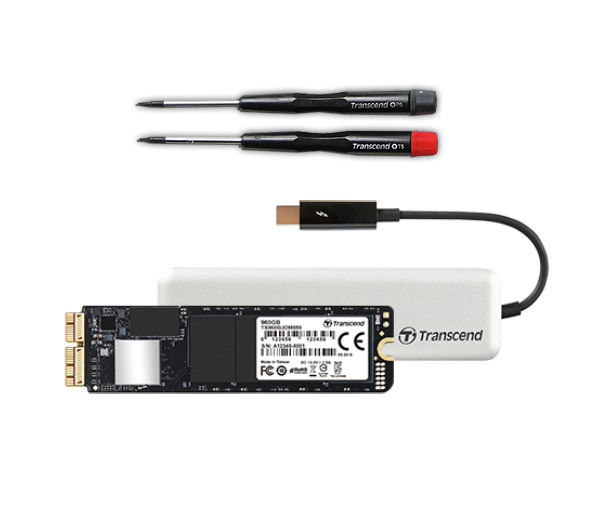
These cloning instructions are for the 2013 Macbook Air to the 2017 Macbook Air. Basically you are cloning Mac onto the new SSD using the OWC, Transcend clone case.
We recommend using SuperDuper! or Carbon Copy cloner to clone your SSD.
Big Sur, Monterey, Ventura cloning issues
Apple has introduced "Signed System Volume" in these OS's. This means only a disk "sealed" by Apple can boot. The cloning software we recommend uses Apple's replication utility to make a duplicate but we are still getting reports of cloned drives that will not boot. See troubleshooting tips below.

READY
We ship the SSD already initialised and checked. All you have to do is clone your old SSD onto the new SSD. Put new SSD into the clone case. Install SuperDuper! or Carbon Copy Cloner and clone from old SSD to new SSD.
REPLACE
Shut down the mac and replace old SSD with the newly clone SSD.
RESTART
Power on the Mac and check the clone was successful.
RESTORE
Go to System Preferences then Start Up Disk, select the new SSD and the system will reboot. This tells the Mac that the new SSD is the one to boot from.
Software and tools you need
Our SSD KITS include everything you need to clone. The kits include SSD, printed instructions and tools.
• Choose the size of your SSD kit here

Storage upgrade for 2018-2023 Macbook Air
Macbook Air's from 2018 to 2023 have an SSD (storage) that is not upgradeable, it is soldered onto the main board. However the Thunderbolt 3 and 4 port is as fast as internal storage. For more storage, add an external SSD. It can be used to save file or as a new boot drive.
The advantage is your new storage is super portable, as you are not installing an internal SSD, it can be used on any Mac or PC, and used as storage in the future when you upgrade to a new Mac.
Please note: the instructions below are to create a new bootable external drive (run your Mac off the new SSD). If you just want more storage, all you need to do is Step 1 = plug in new SSD and initialise.
READY
Connect the external SSD to the Mac via Thunderbolt port. Go to Disk Utilities and initialised (erase) the SSD.
RESTORE
Download and install SuperDuper! (Free) or Carbon Copy Cloner software (30 day free trial). Clone your internal SSD to the new external SSD. Once successfully cloned, shut down the Mac.
RESTART
Plug external case into Macbook Air and restart your Mac holding down the Option key. Your original drive and the new external drive should appear on screen, click on the new external drive and the Mac will boot off it.
RESTORE
When you log in, go to the top left of the screen and select System Preferences. Then go to Start Up disk. Unlock and select the new external SSD as the start up drive. The system will restart and boot off the new SSD. Now on restart it will boot off the external SSD. If everything works, erase the internal SSD and use as extra storage.
Software and tools you need
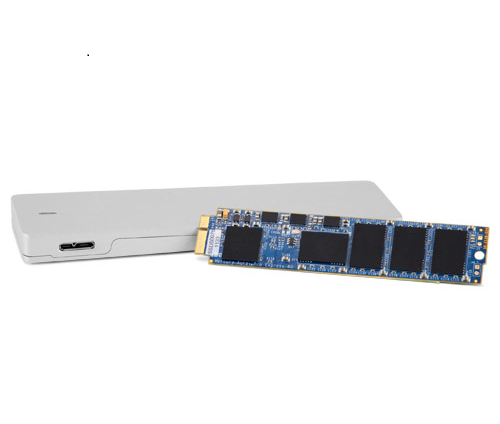
All you need is an external SSD! We recommend the Envoy Express.
• Carbon Copy Cloner download by Bombich (30 day trial).
• SuperDuper! software by Shirt Pocket (free download).
• Choose the size of your Envoy Pro here
Four R method: Fresh macOS

Sometimes a Mac needs a fresh start. Apple makes it easy to reinstall macOS.
MacOS can be installed via Recovery Mode or via a macOS USB. We have previously recommended USB installers but Apple has updated and improved Recovery install. Restarting the Mac holding down Option - Command - R will give you the latest MacOS that can be installed. More detailed info is in our How to install macOS section.
READY
This method takes a little bit of planning. OSX or macOS (as it is now called) can be installed on an empty SSD via Recovery Mode or installing off media such as a USB. If you are installing from USB, you need to make that macOS USB before you start. Recovery Mode is installing the macOS from a Time Machine or a Mac drive recovery partition or Internet Recovery (Option + Command + R).
RESTART
Shut down your Mac.
REPLACE
Install the new SSD.
RESTORE
If you are installing macOS from USB, then insert macOS USB, hold down option key and restart Mac. To use Internet Recovery mode and get the latest MacOS, restart the Mac holding down the Option + Command + R keys. The Mac will create the macOS Utilities page, go to Install new macOS and follow the prompts.
Software and tools you need
There are many options when starting fresh. You can install the current version of macOS or a later version that is more compatible with your apps and programs. You can put the latest macOS on your new SSD then use the Migration Assistant to copy over data and programs. You do not have to connect to another Mac, you can connect to a Time Machine or external startup disk to transfer files!
• Familar with how to Internet Recovery macOS or have an macOS USB drive.
• Choose an SSD drive here all tools and instructions include in the SSD kit.
The Upgradeable Team is here to help. If you want advice or check with an expert, please call, chat or email.

Choose a SSD cloning KIT for your Macbook Air
These are complete kits, including SSD, that include everything you need to do any type of clone or restore on your Macbook Air. If you are not sure, please contact us for an obligation free discussion.
The individual blades are listed further down the page
If you are unsure of your model, use
the Macbook Air configurator
1. Find your model
2. Select the compatible upgrade
For MacBook Air 11" & 13" (Mid 2013 - 2017)

2TB OWC Aura Pro X2 SSD and cloning kit for late 2013 and later MacBook Pro & Air & iMac Apple compatible
Part No: UA1891
$ 828.00
5 in Stock
1TB OWC Aura Pro X2 SSD and cloning kit for late 2013 and later MacBook Pro & Air & iMac Apple compatible
Part No: UA1890
$ 499.00
12 in Stock

960GB High Performance NVME M.2 Transcend Jetdrive 855 SSD and cloning kit for late 2013 and later MacBook Pro & Air & iMac Apple compatible
Part No: UA1040
$ 469.00
< 5 in Stock

480GB OWC Aura Pro X2 SSD and cloning kit for late 2013 and later MacBook Pro & Air & iMac Apple compatible
Part No: UA1889
$ 359.00
9 in Stock
$ 334.00
< 5 in Stock
For MacBook Air 11" and 13" (2012)
$ 529.00
< 5 in Stock

$ 339.00
< 5 in Stock

$ 239.00
< 5 in Stock
Choose a SSD BLADE for your Macbook Air
These are SSD blades only. They do not include the clone kit. We can include a macOS installer USB for free with a blade purchase, just type which macOS version you would like in the customer notes at checkout.
Why buy just a blade? Customers who buy a blade are usually starting with a fresh macOS and not cloning any data from the original Apple SSD. A Time Machine restore also does not need a cloning kit, as long as you have all the tools you need (Pentalobe and Torx T5 screwdriver). Tools are available to be bought separately below. If you are not sure, please contact us for an obligation free discussion.
The cloning kits are listed above, and individual items like tools are further down the page

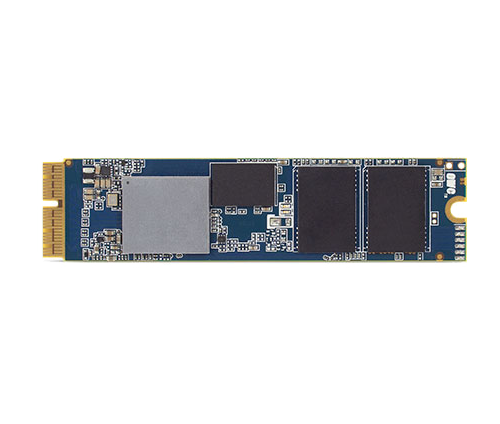
2TB High Performance NVME M.2 OWC Aura Pro X2 SSD for late 2013 and later MacBook Pro & Air & iMac Apple compatible
Part No: UA1066
$ 698.00
5 in Stock
1TB High Performance NVME M.2 OWC Aura Pro X2 SSD for late 2013 and later MacBook Pro & Air & iMac Apple compatible
Part No: UA1052
$ 419.00
8 in Stock
960GB High Performance NVME M.2 Transcend Jetdrive 850 SSD for late 2013 and later MacBook Pro & Air & iMac Apple compatible
Part No: UA1037
$ 399.00
< 5 in Stock

480GB High Performance NVME M.2 OWC Aura Pro X2 SSD for late 2013 and later MacBook Pro & Air & iMac Apple compatible
Part No: UA1051
$ 254.00
12 in Stock
$ 334.00
< 5 in Stock
How to install macOS
Note: Updated October 2022: Apple has changed the way you can reinstall MacOS. Via Internet Recovery you can get the latest MacOS or the current version of MacOS on the Mac.To get the latest MacOS restart holding down Option + Command + R keys. This is the one we recommend because it has an almost 100% success rate.
To get the version of MacOS on your system, restart holding down Command + R keys. This usually gives you the wrong OS and is not recommended.
Unfortunately Apple does not have a way to select the version of MacOS you want. To get a specific version, make a USN installer.
Please note Macs earlier than mid 2010-2011 can not use Internet Recovery and require a macOS USB installer.
What format to initialise the new SSD?
From High Sierra, Apple has a new drive format structure. When you upgrade to High Sierra, Apple changes your drive format structure to APFS. High Sierra will only reliably work on a drive formatted as APFS.
If you are installing High Sierra the SSD needs to be in Mac OS Extended (Journaled) for the installer to recognise the SSD. The installer will change the SSD to APFS during the install.
To install Mojave, Catalina, Big Sur, Monterey, Ventura: initialise the SSD as APFS.
To install High Sierra, Sierra, El Capitan, Yosemite and earlier: initialise the drive as Mac OS Extended (Journaled)
How to get the latest macOS on a new SSD?
To reinstall using OS Recovery you need an internet connection, either wireless or ethernet cable. To start up using OS Recovery, start up your Mac and immediately hold down one of these combinations of keys.
Command-⌘-R
Reinstall the latest macOS that was installed on your Mac.Option-⌘-R
This will upgrade to the latest OS compatible with your Mac. (recommended)Shift-Option-⌘-R
Reinstall the macOS that came with your Mac, or the closest version that's still available.How to use Migration Assistant
Apple includes an awesome app called Migration Assistant that we have used to help customers start over with a fresh macOS but keep all their data and applications. Apple allows a lot of different installation and migration options. We will discuss the main ones here, but if this does not answer your migration question, please contact us for more specific information about the upgrade you are planning.
What is Migration Assistant...why should I use it?
Migration Assistant allows you to transfer applications, settings and data from another Mac. macOS can see "another Mac" as your old hard drive or a Time Machine back up. A mac can boot from an external drive, for example, if you put your old hard drive into an external enclosure, you can boot from it, and run that hard drive and it would be exactly the same as your old mac...because it is!
If you just want a new macOS, start fresh with no legacy upgrade data, then you can use Migration Assistant to reinstall all your data and apps, and you will have the benefit of a new macOS with all the apps and data from your old drive.
How to use Migration Assistant
After you have installed the new macOS, the system starts and asks for generic information: country, keyboard type etc. The next part of the installation setup is Migration Assistant.

If you have installed a new SSD, you can use either your old SSD in the Envoy enclosure or a Time Machine back up as a source for Migration Assistant.
The example in the image below, a Time Machine disk is connected and to be used

Select the machine you want to restore from in Time Machine

Then select the type of data you want to migrate

That is it! You should have a new macOS with all your applications and data restored back on the system.
Limitations of Migration Assistant
The new Mac can not be on Lion (v10.8) or earlier. If you are migrating to an old version of OSX such as Lion, then you need to use another method.
This method is not recommended if the macOS are too far apart in release. It is ok if you are moving from Sierra to High Sierra. But if your computer is on Lion, your application and core system files will not be compatible with High Sierra.
Time Machine: why you should use it
Time Machine has many features that can make your life easier when upgrading to an SSD.
You should be backing up on a regular basis and Time Machine is Apple's built in back up software that is easy to use.
To create backups with Time Machine, all you need is an external storage device. After you connect the device and select it as your backup disk, Time Machine automatically makes hourly backups for the past 24 hours, daily backups for the past month and weekly backups for all previous months. The oldest backups are deleted when your backup disk is full.
If you connect a new external drive to your mac you should see this window pop on the screen

If you dont get the pop up you can go to Time Machine app and select disk or add Disk.
The software will set up automated back ups. If you periodically connect the Time Machine, if it does not automatically start you can start a backup manually, choose Back Up Now from the Time Machine.
First the most asked question we get: Does Time Machine back up the operating system or macOS?
If your Time Machine is backing up your whole drive, yes the macOS is backed up. You have a complete back up of your Mac. You do not have to download macOS to use your Time Machine. In Sierra and High Sierra we have seen Time Machine go off to the Apple website to verify or update core files. It is not totally understood what is happening, but it is not uncommon for Time Machine to get additional files from the Apple website before restoring a Time Machine back up. Usually these files are to do with the recovery partition on the Time Machine or the Disk Utilities page.
Restore on a new SSD and the Double Clone
One of the best features of Time Machine is you can you it to restore to a new SSD. We have outlined the process in our Four R Restore from Time Machine. What if you dont have a Time Machine and/or you have not been backing up your data? No judgement here, but here is a way to fix all that. We call it the Double Clone.
The Double Clone
Instead of ordering a clone cable or an external clone case, you buy an external drive. A 1tb or 2tb drive is a good size, the major brands are Toshiba, Seagate, Verbatim or Western Digital. You dont need the SSD version, just a standard external drive.
Format the external drive. Use Carbon Copy Cloner to clone your Mac onto the new drive. Install the new SSD. Restart the Mac holding down the Option key. Select the new cloned external drive. You are now running your Mac off the external drive. Use Disk Utilities to initialise the new SSD. Open Carbon Copy Cloner and do a second clone, this time from the external drive to the new SSD. When the clone if finished, shut down the Mac, remove the external clone and restart the Mac. Go to System Preferences and set the start up disk to the new SSD. Open Time Machine, plug in the external drive, if you don't get the pop up window asking to turn teh drive into a Time Machine, then select disk or add Disk and start a new Time Machine. Please note it will erase all the clone data, be sure your new SSD is working as expected before erasing the clone. That is the Double Clone: get a new SSD and a new backup system with Time Machine!!
Rebooting off Time Machine
Time Machine does not have a recovery partition, however you can use it to restore your Mac or install a new macOS. If you want to use Time Machine in this way, plug the Time Machine into the Mac, then restart the Mac holding down the Option key. This loads the boot manager and you can see all drives attached to the Mac. The Time Machine should display as an external drive. Select it and the Mac will build a macOS Utilities page that will have Disk Utility (to initialise a new drive or erase a current drive) and install a new macOS.
How to create a macOS USB
There are a lot of options to create bootable USB to install macOS. We have recommended Diskmaker X in the past but the method we outline here is the recommended method from Apple.
This is our summary of how to make a macOS USB drive. With this drive you can install macOS on a blank SSD or boot from this USB and use the tools and utilities to check or format a Mac drive.
Download Ventura
Go to the App Store, search for macOS Ventura and download. After it has downloaded it should appear in your Applications as "Installer MacOS". If you have already downloaded and upgraded, you will need to download the MacOS again (Apple deletes installer once it has been used).
16GB USB
You need at least an 16GB USB drive. For best results use a USB 3.0. You can use an external hard drive (note: any data on the drive will be lost as it gets formatted). Go into Disk Utilities and rename the USB to "upgradeable". You can erase and rename. The MacOS creation method will reformat the drive, so it does not need to be any specific format type like Fat32 or Mac Journaled. What is important is the name of the drive, as it is used in the code below.
Using Terminal
We are going to use the command line app called Terminal to create the MacOS drive. Don't worry if you have never used it, it is very easy, not that scary. Open Terminal, it is found in the Utilities folder in Applications.
Copy this code
sudo /Applications/Install\ macOS\ Ventura.app/Contents/Resources/createinstallmedia --volume /Volumes/upgradeable
Paste the code
Paste the code you copied into Terminal and hit enter. It will ask for your system password (usually the one you log on with at start up). Type Y
and return when it asks if you want to erase this drive. When it is
finished creating it will display "Copy complete". You can close Terminal.
How to use the USB
When the USB or external drive is plugged in, restart the Mac holding down the Option key. The USB will appear on screen as Install MacOS. Select and hit return. You do not need to select a network. If you are installing the macOS on a new SSD it will need to be initialised. Go into Disk Utility, Erase and name. Proceed to install macOS.
Other macOS codes
Monterey
sudo /Applications/Install\ macOS\ Monterey.app/Contents/Resources/createinstallmedia --volume /Volumes/upgradeable
Big Sur
sudo /Applications/Install\ macOS\ Big\ Sur.app/Contents/Resources/createinstallmedia --volume /Volumes/upgradeable
Catalina
sudo /Applications/Install\ macOS\ Catalina.app/Contents/Resources/createinstallmedia --volume /Volumes/upgradeable
Mojave
sudo /Applications/Install\ macOS\ Mojave.app/Contents/Resources/createinstallmedia --volume /Volumes/upgradeable
High Sierra
sudo /Applications/Install\ macOS\ High\ Sierra.app/Contents/Resources/createinstallmedia --volume /Volumes/upgradeable
How to initialise a SSD
When you get your new SSD it might be uninitialised. It needs to be initialised before use. In the PC world they call this formatting the drive. In the Mac World it is called Erase and it is a function of Disk Utilities
Disk Utilities is a tool included in many places. It is found in the Utilities directory in Applications. It is included in any macOS install drive. It is found in the recovery partition on a drive when a Mac is restart holding down the keys Command + R. It is also a part of the Internet Recovery boot up. There are many reasons why you would want to erase a drive, this guide is focused on initialising a new SSD, however for readers who are looking at general information we have added the following warning...
Warning: Erasing a disk will delete all data on the disk. Never initialise/erase a drive that has data on it that you want to keep. I know that sounds obvious but you would be surprised with the support calls we get :-). Four steps to initialise a new SSD.
Open Disk Utility
When you start Disk Utility, in the sidebar are the drives attached
to the Mac. Select the disk name, not the indented volume name.
Erase button
Click on the Erase button. If there is no erase button select the drive again.
Options
There are two to three fields that need to be selected.
Name: Enter a name for your disk, such as "Macintosh SSD"
Format: Choose APFS (for Mojave, Catalina, Big Sur, Monterey and Ventura) or Mac OS Extended (Journaled) for earlier macOS like El Capitan
Scheme (if available): Choose GUID Partition Map

ERASE
Click the Erase button and the SSD will be ready to use.
How to clone with SuperSuper!
Please note: this process cannot be used to clone a Windows partition created by Boot Camp. We recommend WinClone by Twocanoes Software. It is commercial software requiring a license to use, however it is not affiliate with our company and that is not an affiliate link.
Before cloning, the SSD needs to be initialised, if that has not been done, please follow our instructions above.
The process is really only two steps...download and run. Superduper! is very simple but powerful piece of software.
Download and install
SuperDuper! software by Shirt Pocket (free download).
When the download is complete, install in your Applications folder.
Double click on the SuperDuper! icon to run
Clone
Choose your source (Macintosh HDD) and destination (Macintosh SSD) drives. Click Copy Now to begin. You will be notified when it is complete.

My cloned drive will not boot
From Big Sur macOS Apple introduced "Signed System Volume". This means only a disk "sealed" by Apple can boot. The cloning software we recommend uses Apple's replication utility to make a duplicate but we are still getting reports of cloned drives that will not boot. If you are having an issue, here are some troubleshooting tips.
macOS install
If you have cloned your drive, after installation, it will not boot, the quick and simple solution is to reinstall macOS. Now that the OS is in it's own separate disk volume, reinstalling the OS does not affect the data on your drive. To get the latest macOS, restart the mac holding down the keys "option" + "command" + "R" and the mac will use internet recovery to download the latest OS that will run on your mac. Choose option install macOS and follow instructions. Do Not format or initialise the drive.
If you want a specific macOS version, you can only do that by creating your own macOS USB installer. See instructions above.
Start again
Install macOS and there is an option at the end of the install to transfer data from another Mac. Connect your old mac drive, transfer the data onto the new macOS.
Simple Questions answered
Can I use any SSD to upgrade my Macbook Air?
No. The Macbook Air use a special SSD blade that is specific to the Macbook Air. You can not use a standard 2.5" notebook SSD. There is an SSD compatible for the year of your Macbook Air, please check before ordering. You can find your specific model inour configurator.
Does the Macbook Air use a standard M.2 SSD blade?
No. It is only standard in it's physical size. A standard M.2 drive will not work. Apple has made their drives proprietary.
Are the OWC SSD drives faster than the Apple original SSD?
Yes, all the SSDs we sell will increase the speed of your Macbook Air!
Do I need a bracket to install the SSD?
No.
Can I do this install myself?
Yes. We have had customers of every type of experience: students to pensioners do this upgrade. It is only slightly more complicated than a RAM upgrade.
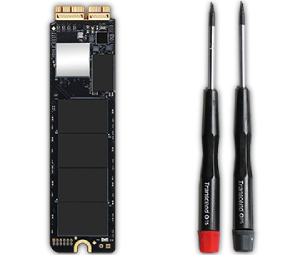
Do I need any special tools?
The SSD kits include all the tools you require: a Pentalobe and Torx T5 screwdriver. These are sold separately if you only need a blade and not a kit.
Does the original SSD and the new SSD have to be the same size to clone?
No. As long as the source (current hard drive) has less data than size of the new SSD. So 300GB on a 1TB hard drive will clone onto a 480GB SSD.
What size SSD should I buy?
We recommend you look at how much data is on your hard drive and then get a SSD at least 20% bigger than the data you have. We have found the optimal free space for a SSD to work with virtual and swap files is 20%. Aim for 30 to 40%. It all depends on your work flow and how much data you store and delete.
Can SuperDuper! clone a windows partition?
No. We recommend Winclone for this type of clone.